Interface and navigation
Forge keeps the core workflow visible: the viewport is where you model, the action panel provides the next relevant tools, and the toolbar controls modes, snapping, help, and project actions.
Native for macOS and iPadOS. Forge provides the same focused modeling workflow on both platforms.
For a first session, Before your first lesson provides a labeled starting screenshot and recovery steps.
Learn selection and tool controls
Learn by example explains Object, Vertex, Edge, Face, and Paint modes with a selected-face screenshot. Its Apply/Done guide shows when an operation is a preview and when it is committed.
Model workspace, Scene workspace, and selection modes
The Model / Scene control at the top selects the workspace. Model is where you edit a model's mesh; Scene is where model instances can be arranged into a composition. The tutorials begin in Model.
The Scene button in the bottom selection toolbar opens the Outliner for the current modeling context. It is separate from the top Scene workspace button. Use the Outliner for object selection and hierarchy operations.
Modes
- Edit is the modeling workspace. It includes selection, mesh tools, materials, paint, references, and the scene hierarchy.
- Studio/PBR switches viewport shading to the Studio renderer. Turn it on with the transparent-cube button in the viewport display strip; the environment and renderer-options controls then appear. This does not require leaving the modeling workspace.
- Animation replaces the lower modeling controls with the timeline. Closing it restores the normal modeling controls without deleting clips or keys.
- Selection modes include Object, Vertex, Edge, Face, Paint, Camera, and Scene. Choose the mode that matches the kind of thing you want to change.
Action panel layouts
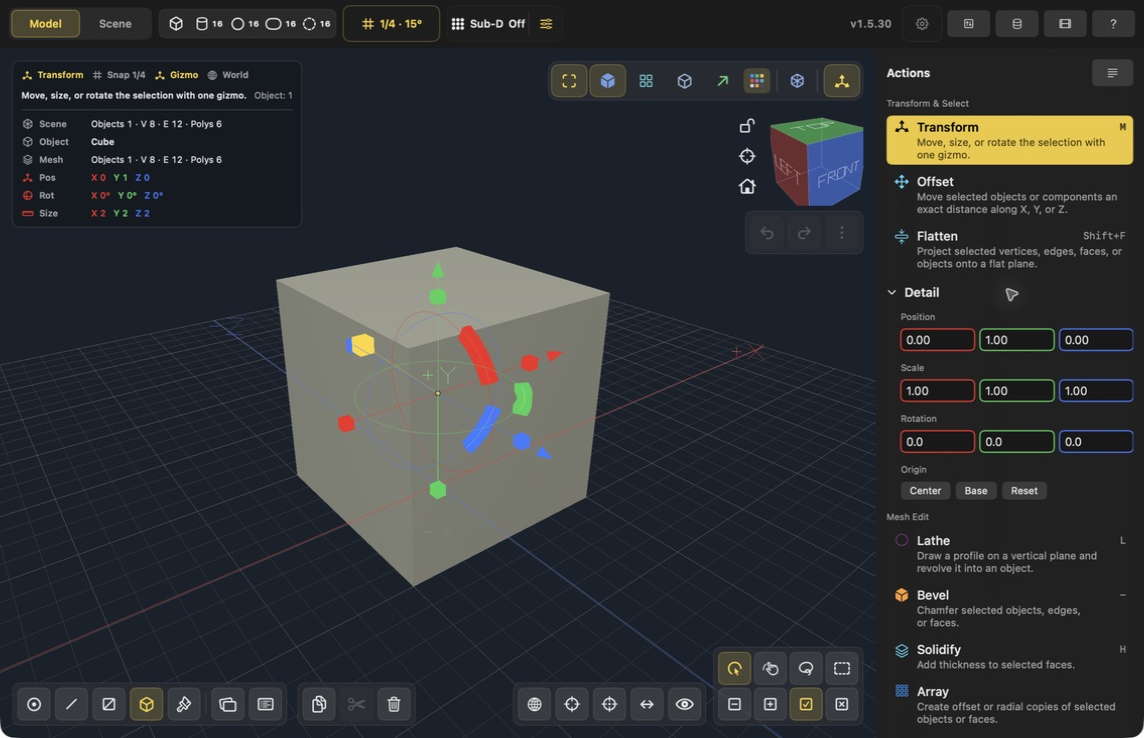
Find Object mode at the cube icon in the bottom toolbar. Find Transform in the right Actions panel; Detail expands the numeric fields. The small layout button is at the top right of Actions. Screenshot: Mac v1.5.30.
For a task-based tool finder and comparisons, see What do you want to do?.
For a step-by-step example using these controls, see Center and align objects.
The action-panel header cycles through three layouts:
- Full shows tool names, descriptions, options, and detail controls.
- Names keeps icons and names while omitting descriptions to preserve viewport space.
- Icons provides the narrowest rail for maximum viewport room.
The responsive bottom toolbar rearranges controls only when the available width requires it, making the same commands practical on narrow iPad and Mac windows.
Viewport
Use the camera controls to orbit, pan, and zoom. Forge supports perspective and isometric views, framing the selection or the full scene, material and solid display, wireframe overlays, and a normals diagnostic mode. On macOS, right-button drag pans the viewport; mouse-wheel input zooms, and Command + two-finger scroll provides an explicit trackpad zoom gesture.
The View Cube is both a view picker and an orbit control. Tap a visible face to align and frame that orthographic view, drag the cube to orbit, or open its context menu for the complete Front, Back, Left, Right, Top, and Bottom preset list.
The viewport can show selected components, face normals, open boundaries, non-manifold edges, UV seams, and mesh-health warnings. These overlays make it easier to catch a problem before exporting a game asset or a printable model. Enable Xray Components when hidden components should remain visible at reduced opacity.
Use the visibility menu to Hide Selected, Hide Unselected, or Reveal All. In Object mode it works on objects and preserves selected hierarchies when isolating them; in Face mode it works on faces. Visibility changes are undoable.
Grid and transforms
Grid subdivisions range from 1 to 64, and the active snap affects many direct tools, including transforms, Offset, extrusion, inset, cuts, lathing, bevel, and solidify. Modeling sliders that operate in world space use the current grid step while typed numeric values remain exact.
The Grid popover also has a persistent visibility switch. Hiding the modeling grid does not disable position or rotation snapping.
The transform gizmo moves components and can move, size, or rotate selected objects. Choose the axis orientation that matches the task:
- World follows the scene axes.
- Local follows the object's axes.
- Selection follows the active face, edge, or vertex, with local orientation as the Object-mode fallback.
- View keeps horizontal and vertical axes aligned with the screen and points the depth axis toward the viewer.
Choose Origin, Selection, or Active for the transform center. Reset bakes object rotation and scale without changing its world-space shape, then places the origin at the selected component in Vertex, Edge, or Face mode, or at world zero in Object or Scene mode.
Every selected object shows a small origin dot. Enable Show Pivots in Preferences to reveal its local XYZ pivot axes, which is especially useful for checking orientation and finding flipped items in a hierarchy.
Scene and project controls
The bottom-toolbar Scene Outliner button opens the Outliner, where you can select, rename, group, ungroup, hide, and reorder objects. Group creates an organizational container. Parent instead makes the active object the transform parent of the other selected objects, allowing forward-kinematic hierarchies of arbitrary depth. Unparent moves selected objects back to the scene root without flattening their descendants, and world transforms are preserved.
Project metadata and the library live in the Project Database. Load replaces the open project with a stored project. Merge appends a stored project's objects, hierarchy, layers, materials, UV maps, paint, and animation clips to the current project. Imported content is selected, project-unit differences are converted automatically, and the complete merge can be undone.
Each document has a Units setting for millimeters, centimeters, meters, or inches. Changing it does not rescale scene geometry; it determines how Forge displays measurements and how supported exports interpret the scene.
Reference images can be imported from Photos or Files, shown or hidden, locked, resized, recentered, replaced, or removed. They are saved with the project so a visual guide remains available the next time you open the model.
On iPad, optional two- and three-finger tap gestures can be assigned in Preferences to Undo, Clear Selection, or toggle Add/Replace selection. They are off by default, and assigning a gesture to one action removes it from the others.