Modeling and mesh workflow
Forge is most effective when you move from silhouette to detail. A box can become a crate, a tower, a vehicle body, or the foundation of a figurine without leaving the direct viewport workflow.
Native for macOS and iPadOS. Build your props and printable assets with Forge on either platform.
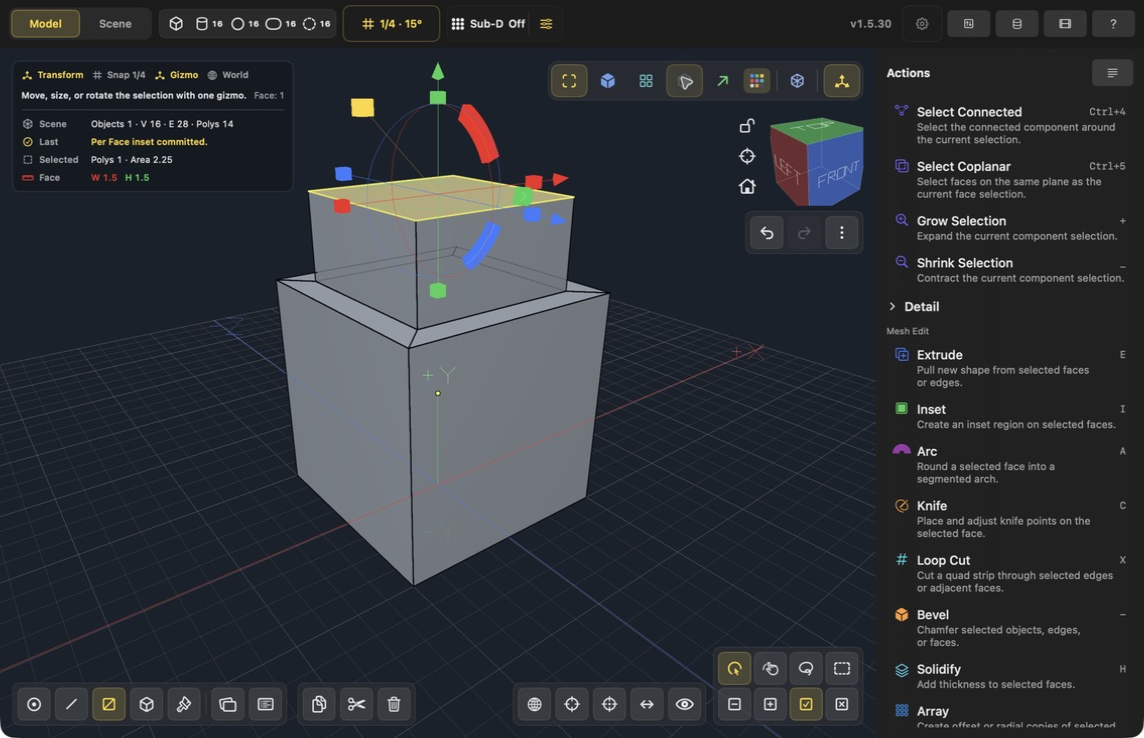
Mac v1.5.30: the committed border and side walls are visible in Shaded + Wire.
Follow a modeling lesson
Unsure which operation fits? Start with What do you want to do?.
-
Make a window: Knife defines a region; Cut Through builds the opening and tunnel walls.
-
Make a raised panel: select a face, inset a border, and extrude connected geometry.
-
Round and repeat a part: bevel a cube and create an evenly spaced row with Array.
-
Center and align objects: match object positions without confusing alignment with pivot placement.
Shape first
Start with a primitive or an imported SVG solid, then use the move, size, and rotation handles of Transform to set its proportions. Expand Detail for exact Position, Scale, and Rotation values. For attached volume, choose Extrude. For a raised or recessed surface without creating a separate object, use Push/Pull. Inset creates borders, frames, panels, doors, windows, and recessed details.
Arc, Knife, Cut Through, and Lathe make more specific forms without introducing a separate modeling system. Bevel softens hard edges, while Sub-D gives you a reversible smooth preview over the original editable cage. Use Subdivide when you want real editable faces instead; in Object mode it subdivides every face on each selected object.
Relax evens out selected mesh vertices with one conservative smoothing pass. Select distorted vertices or faces to move interior vertices toward the average of their connected neighbors. Boundary vertices remain fixed, and you can repeat the undoable command deliberately for stronger smoothing.
Precision and alignment
Want to center two whole objects? Follow Center and align objects, with real Mac screenshots and exact Position-field steps. The face-attachment workflow below is a different operation.
Offset moves selected objects, vertices, edges, or faces by an exact signed distance along world X, Y, or Z. Choose the axis, enter a distance in the current project unit, preview the change, then apply it. Multiple selections retain their relative spacing.
Use Selection transform orientation when a gizmo should follow the active component, or View when a move, size, or rotation should be screen-relative. The active grid step controls slider increments for world-space modeling tools, while direct numeric entry remains exact.
Align one part to another
- Select the mesh region that should move.
- Select its attachment face last so that it becomes the active source face.
- Start Align to Face.
- Pick the destination face in the viewport.
Forge places the source face against the destination with opposing normals. The selected region moves rigidly, preserving its topology.
Turn a loop into a circle
Select a closed, non-branching vertex or edge loop, or a connected face region with a closed boundary, then choose Circlify. Adjust Influence for a partial or complete result. Regular Spacing distributes vertices evenly around the fitted circle; Preserve Surface projects the result back onto the original mesh surface.
Keep topology healthy
Use the selection helpers to reach the area you need: loops, edge rings, boundaries, connected components, coplanar faces, hard edges, and open edges. Commands such as Connect, Bridge, Loop Cut, Edge Slide, Split Edge, Fill, and Merge make targeted topology edits possible. Edge Slide follows the neighboring topology rails for open chains and closed loops, helping preserve the surrounding contour, and it respects active live-symmetry axes.
When a model has been heavily edited, use Recalculate Normals, Weld, Remove Degenerates, Fill Holes, or Cleanup Mesh. The viewport’s mesh-health overlays help locate open, non-manifold, or invalid regions.
Symmetry and repeated parts
For a symmetrical prop or figurine, model one half then use Mirror, live symmetry, or Symmetrize across the required local axis. Duplicate and Array are useful for repeated beams, planks, bolts, fence posts, wheels, and other modular details.
Hierarchies for articulated assets
Use Group when several items only need an organizational container. Use Parent when selected parts should inherit an active object's movement, rotation, and scale. The active object becomes the parent; every other selected hierarchy root becomes its child. Parent-child relationships can be nested to any depth, making them suitable for segmented characters, articulated props, vehicles, and mechanical assemblies.
Unparent returns selected objects to the scene root while preserving their world transforms and descendants. Parent relationships are also evaluated by the animation system, so rotating a shoulder can carry an arm and hand without skeletal deformation or skinning.
See the tool reference for every command’s selection requirements and practical notes.