Learn by example
Start with a small, complete task. Each lesson shows the selection, the controls, and what you should see after applying the tool. Screenshots are captured from the Mac SwiftUI app, v1.5.30; click any screenshot to open it at full size. On iPad, look for the same tool names; the layout changes with screen space. Windows and Linux layouts may differ.
Not sure which tool name to look for? Use What do you want to do?, including comparisons of similar tools.
First, use Before your first lesson to match the starting state and learn how to recover hidden controls.
Choose a lesson
| What you want to make | Tools you will learn | Start here |
|---|---|---|
| Two parts with matching centers | Object selection, Position, origins | Center and align objects |
| A window through a wall | Knife, Apply Cut, Cut Through | Make a window |
| A raised panel or stepped pedestal | Face selection, Inset, Extrude, Apply/Done | Make a raised panel |
| Rounded blocks in an evenly spaced row | Bevel, segments, Array, offset | Round and repeat a part |
| A cube with a texture layout and a colored face | Smart UV, Pack All, Paint scope, material palette | UVs and your first painted face |
| A dark prop with a painted identification mark | Mark Seam, Unwrap All, UV inspection, packing, Object and Brush scopes | Texture a prop |
| A swinging door with an attached handle | Origin Reset, Parent, Auto Key, timeline, GLB | Animate a hinged door |
| An asset checked before delivery | GLB, units, textures, hierarchy, animation checks | Export and check a game asset |
If this is your first session, start with the raised panel. Each modeling and UV lesson starts with File → New and its untouched default cube; their links suggest a learning order, not edits to apply to the previous result. The game-asset export lesson explicitly continues the completed hinged door.
A useful first-session order is: raised panel → new document → round and repeat → new document → UVs and first painted face. Try alignment whenever positioning parts is your immediate problem.
Understand what is selected
A mesh is made of vertices (points), edges (lines between points), and faces (surfaces enclosed by edges). An object contains the mesh and has its own position, rotation, and scale.
| Bottom-toolbar mode | Selects | Example |
|---|---|---|
| Object — cube icon | A whole part | Move a wheel or bevel an entire box |
| Vertex — dot inside a circle | Individual mesh points | Move a corner or merge coincident points |
| Edge — diagonal line | Lines between points | Bevel a particular edge or mark a UV seam |
| Face — diagonally divided square | Mesh surfaces | Inset a panel or extrude a ledge |
| Paint — paintbrush | A painting workspace | Color one face or brush a small detail |
Changing mode is only the first step. Click the surface or component after switching. A selected object does not automatically mean a face is selected. The upper-left status display reports the current mode and selection count.
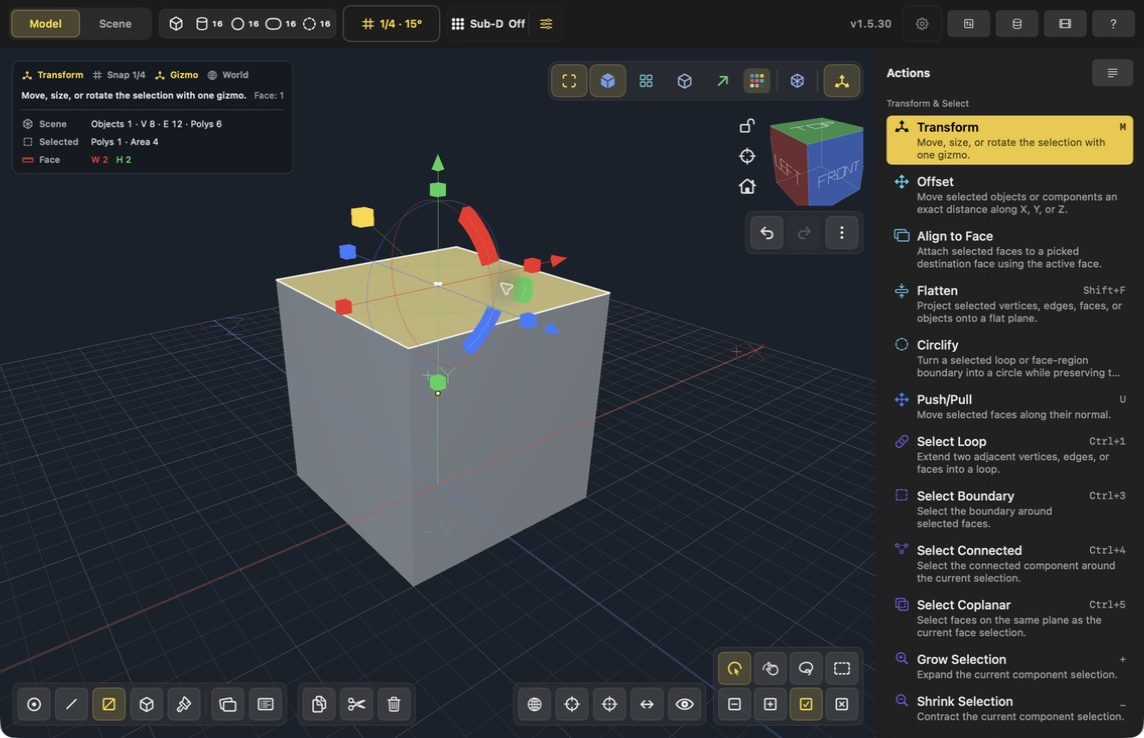
Only the top face is selected. The yellow Face-mode button is in the bottom toolbar. Face-specific tools now appear in Actions.
Use Replace Selection (checked square) to work on one target, Add Selection (plus square) to keep earlier selections while choosing more, and Remove Selection (minus square) to subtract from the selection. The X square clears it. Start the first lessons with Replace Selection to avoid editing an unintended face.
Preview, Apply, Done, and Undo
For the modeling tools in these lessons, the floating card holds the settings; the right Actions panel holds the commit controls. Scroll inside the Actions panel if Apply is out of view. In Full layout it sits below Detail, before the Mesh Edit section.
| Control or action | What happens |
|---|---|
| Change Inset, Extrude, or Bevel Amount | Updates the proposed shape in the viewport |
| Apply Inset / Apply Extrude / Apply Bevel | Commits the mesh edit; the tool remains active |
| Done | Leaves the tool; it does not commit an unapplied preview or undo an edit already applied |
| Apply Cut in Knife | Commits the surface cut and returns to Transform; Cancel Cut abandons it |
| Cut Through | Builds the opening directly from the selected cut region |
| Apply Array in Object mode | Creates the copies and returns to Transform |
| Edit Transform Position and press Return | Commits the numeric edit without a separate Apply button |
| Smart UV, Pack All, or a paint click | Executes directly; no modeling Apply/Done step |
| Undo | Reverses a committed edit |
For a one-time edit, click Apply once, then Done if the tool is still active. Extrude intentionally allows another Apply to continue from the newly selected face. Avoid repeatedly clicking Apply because the tool remains highlighted.
Knife uses Apply Cut, Undo Point, and Cancel Cut. Its lifecycle is shown separately in Make a window.
When something seems wrong
| Symptom | Check this first |
|---|---|
| A tool is missing | Choose its selection mode and select the required components. Scroll the Actions panel. |
| Only icons are visible | Cycle the layout button at the top of Actions to show names and descriptions. |
| Other tools and mode buttons are dimmed | Finish the active tool with Done, or use Knife's Apply Cut / Cancel Cut controls. Apply first if you want to keep a modeling preview. |
| A numeric change did not take effect | Press Return to commit the field; for a preview tool, also click its Apply button. |
| More geometry changed than expected | Check Add/Replace selection and the selection count before applying. |
| A material changes the whole part | Check the separate Brush / Face / Object paint scope. |
| A preview disappeared after Done | Done exits. Apply is the step that commits these modeling previews. |
For tool-by-tool selection modes, constraints, and more examples, use the tool reference.