Animate a hinged door
Make a door swing around one edge while its handle follows. This lesson connects three ideas: an origin defines the object's rotation point, parenting makes an attached part follow it, and keys store poses at different frames.
Start with a new document and the default cube in Object mode in the Model workspace. The screenshots show the Mac SwiftUI app v1.5.30, with the title bar cropped. Click any image to enlarge it.
New to the controls? Match the starting state and learn selection/number entry before continuing.
1. Shape the door
Choose Transform, expand Detail, and enter these values. Press Return after each numeric edit.
| Row | X | Y | Z |
|---|---|---|---|
| Position | 1 | 1.5 | 0 |
| Scale | 1 | 1.5 | 0.1 |
| Rotation | 0 | 0 | 0 |
The default cube becomes a panel 2 units wide, 3 high, and 0.2 thick. Its lower-left edge lies along the world Y axis, with the thickness centered around Z = 0. These are practice dimensions in your document's units, not a life-size door specification.
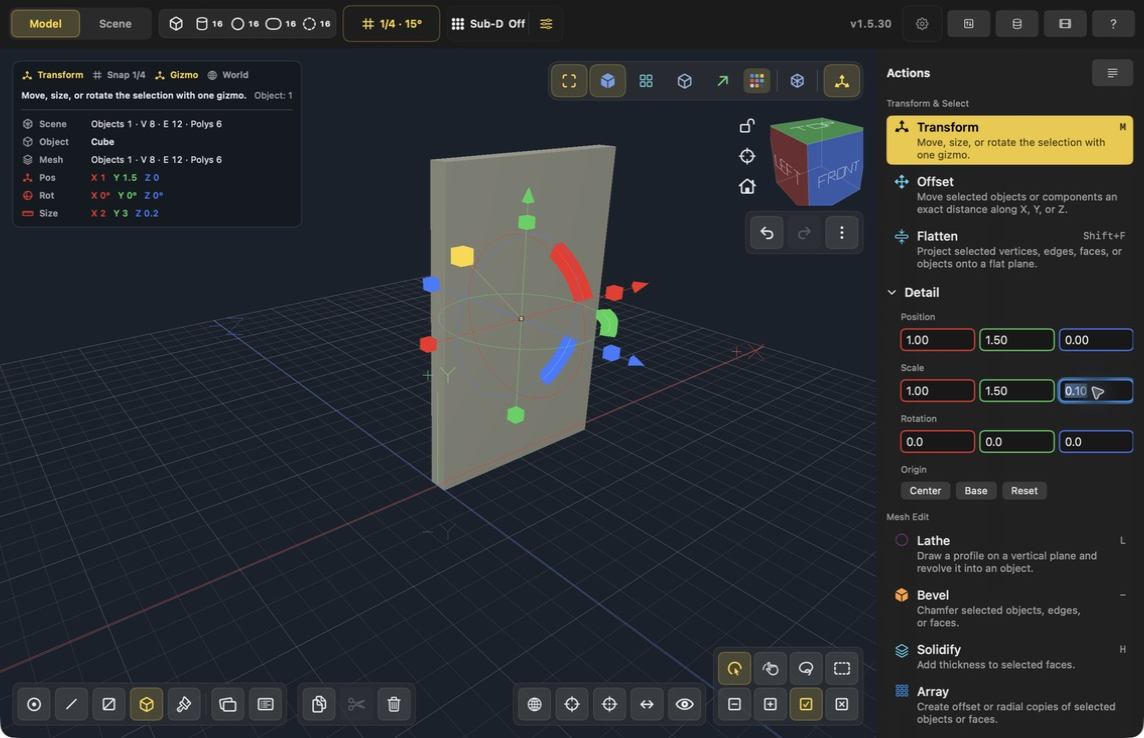
1 — Position. 2 — Scale. The gizmo is still in the middle of the panel. Rotating now would spin it around its center.
2. Put the origin on the hinge
With the door still selected in Object mode, click Origin → Reset under the transform fields.
For this unparented object, Reset bakes rotation and scale into the geometry and places the origin at world zero. The panel stays where it was. Because of the positioning in step 1, world zero is at its lower hinge corner.
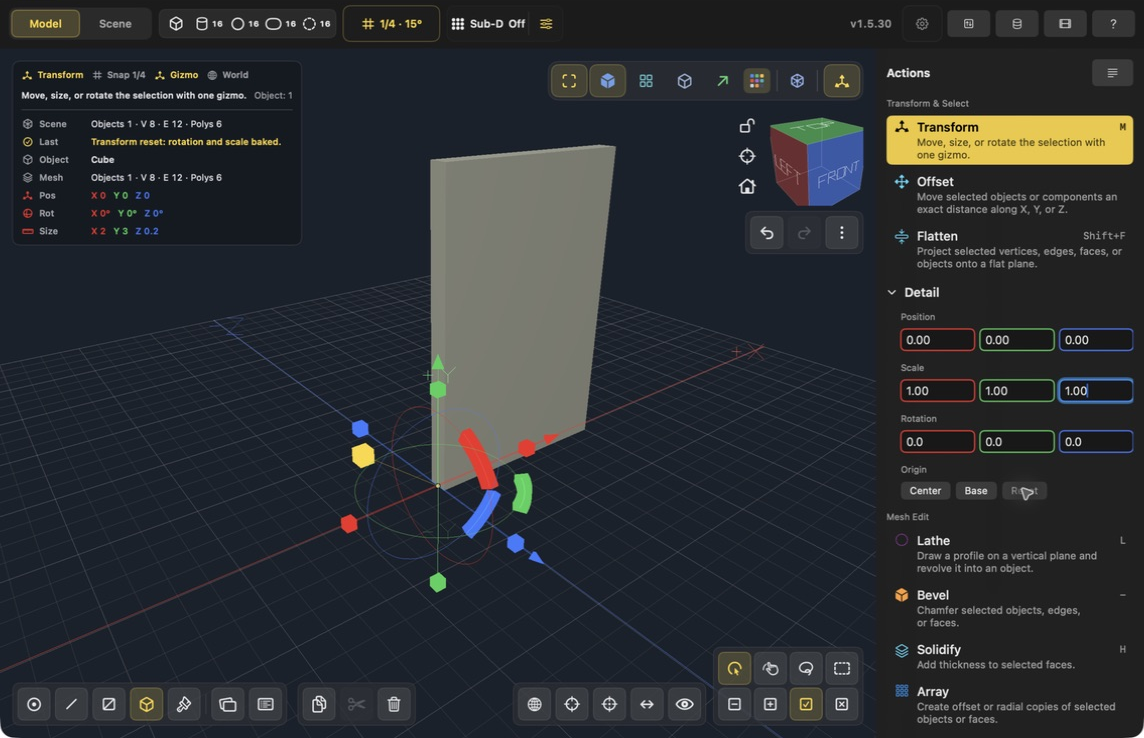
1 — Origin Reset. 2 — New rotation point. Confirm Position is 0, 0, 0, Scale is 1, 1, 1, and the door still measures 2 × 3 × 0.2. A zero position now describes the hinge origin, not the center of the visible panel.
Do this before creating animation keys or attaching children. Center would put the pivot back in the middle; Base puts it at the base center, which is also the wrong place for this side hinge. Reset behaves differently with a selected vertex, edge, or face, so keep Object mode for this exercise.
3. Add and parent a handle
Click the box primitive in the top toolbar to create a second object. Set its Transform Detail values:
| Row | X | Y | Z |
|---|---|---|---|
| Position | 1.6 | 1.5 | 0.2 |
| Scale | 0.08 | 0.08 | 0.15 |
| Rotation | 0 | 0 | 0 |
This makes a small handle near the free edge of the panel.
- Open Scene with the list-in-a-rectangle button in the bottom toolbar. Stay in the Model workspace; the top Model/Scene switch is a separate control.
- The new Box is selected. Click the checkbox beside the original Cube to add it to the selection last.
- Check the active-object target symbol beside Cube. The active object will become the parent.
- Click Parent. The status should report one object parented to Cube, and Box should appear indented beneath it.
- Use each row's pencil button to rename Cube to Door and Box to Handle, pressing Return to finish each name.
The Handle should remain in place after parenting. Select only Door for the animation. The Handle inherits its motion; it needs no separate keys in this lesson. Group is for organization, while Parent establishes the transform relationship used here.
4. Create the first pose
With Door selected, click Animation, the film button in the top toolbar, then Create Clip.
Forge creates Animation 1, records the initial transform at frame 0, moves the playhead to frame 30, and turns Auto Key On. Check those states before dragging anything. The first pose is the closed door you just built.
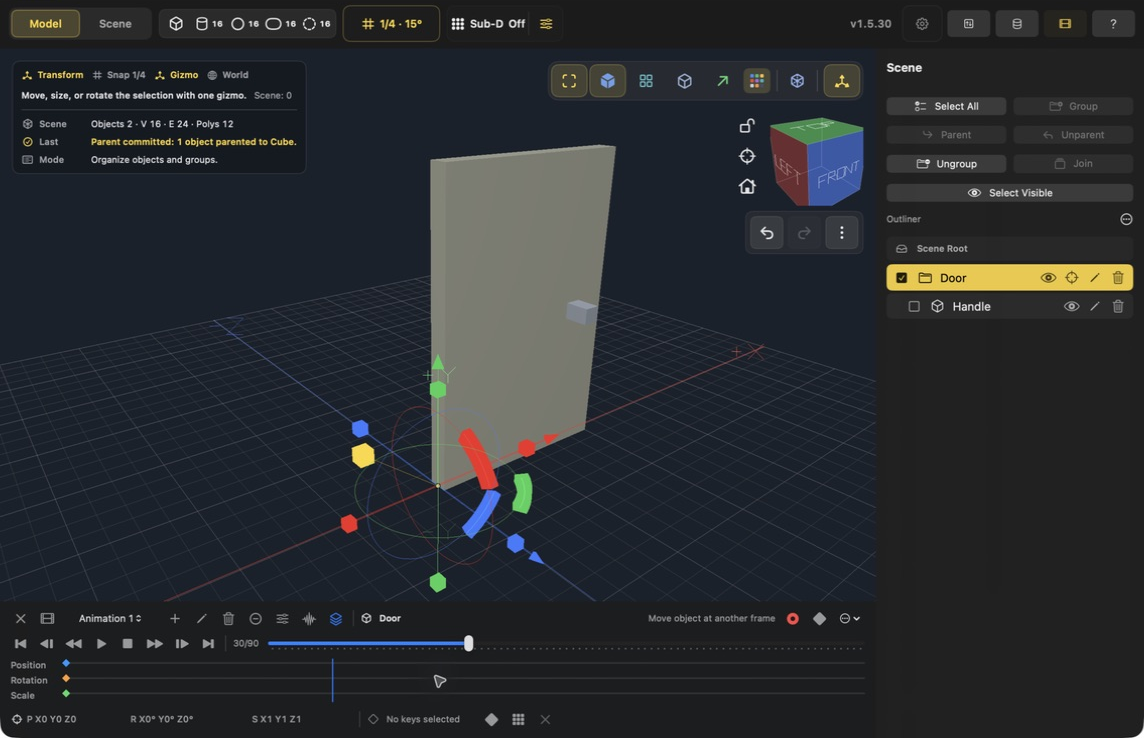
1 — Handle under Door. 2 — Auto Key. 3 — Playhead at frame 30. The diamonds at the left of the three tracks are the first pose's keys. An empty position farther along a track is not a stored pose yet.
5. Key the open pose
Keep the animation workspace open and the playhead at 30. Use the door's green Y rotation arc, the curved green part of the gizmo at the hinge. Drag the arc to swing the door outward. Avoid the straight green arrow, which moves it vertically.
The example uses −45° around Y, with the other rotation components at zero. With 15° rotation snapping enabled, this is three increments. Watch the Current Pose values below the timeline as you drag; direction depends on your view. If you rotate the wrong axis, Undo and try the green arc again.
Auto Key records the changed pose when you finish the drag. You should now see Position, Rotation, and Scale diamonds at both 0 and 30. It is normal for all three channels to receive keys even though only rotation changed.
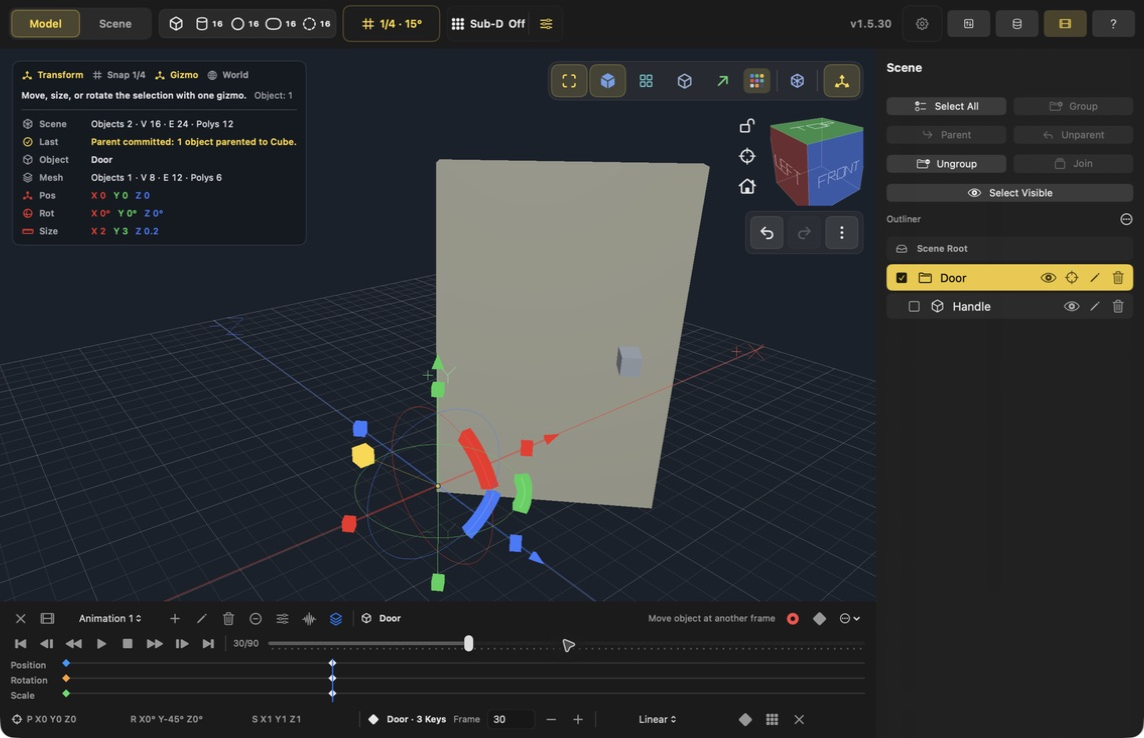
1 — Y rotation arc. 2 — Second pose's keys. 3 — Current rotation. There is no modeling Apply/Done step. If Auto Key is off, use Add Transform Key to record the posed transform explicitly before changing frames.
6. Check the motion
Use First frame to return to 0, then scrub to 15 and 30. Read the current-frame display; scrubbing changes the preview without creating keys.
| Frame | Expected Y rotation with Linear interpolation | Check |
|---|---|---|
| 0 | 0° | Door is closed; hinge stays fixed |
| 15 | −22.5° | Door is halfway open; handle stays attached |
| 30 | −45° | Door reaches the second pose |
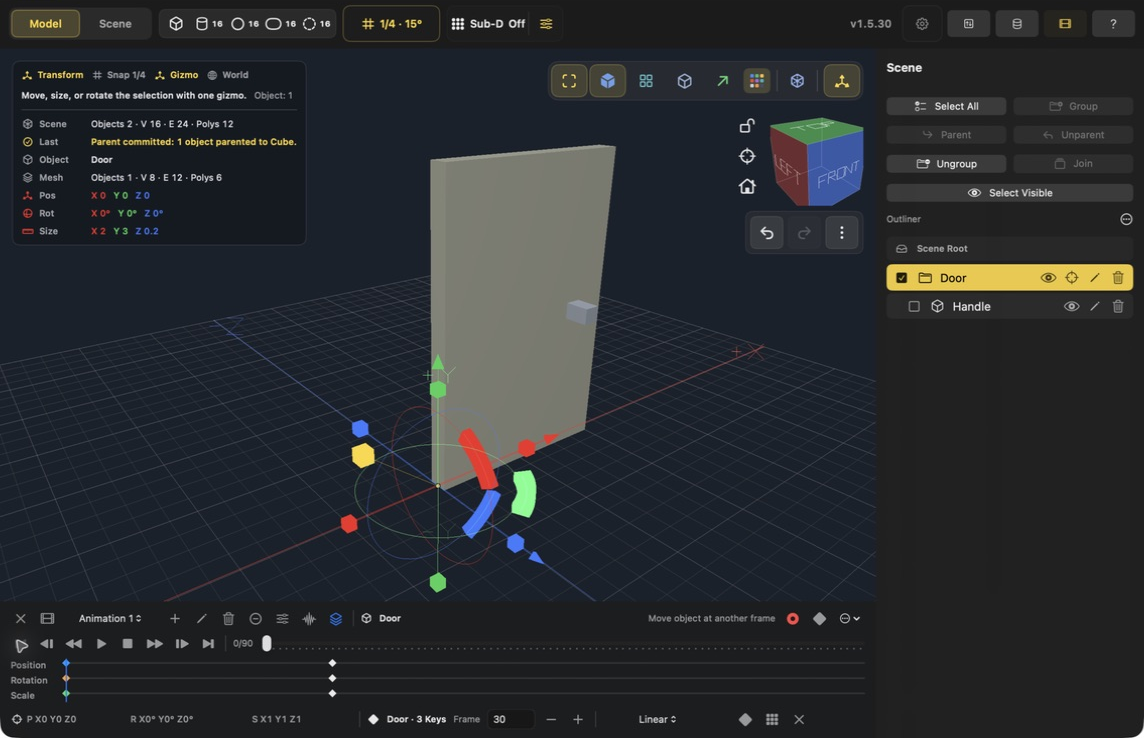
Click Play to preview, then Stop. The example keeps the default 30 FPS, 90-frame duration, and Linear new-key interpolation in Clip Settings. It opens during the first second and holds the last pose for the rest of the clip. Looping restarts at the closed pose; it does not automatically create a closing motion.
To make an open-and-close motion later, add a closed pose at a later frame or explore the animation page's channel behavior controls. Complete the two-pose check first so it is easy to diagnose mistakes.
7. Export the animation
Save the editable Forge document with File → Save, then open Import and Export, the up/down-arrows button in the top toolbar. Choose Export GLB Scene, choose a destination, and click Export in the save dialog.
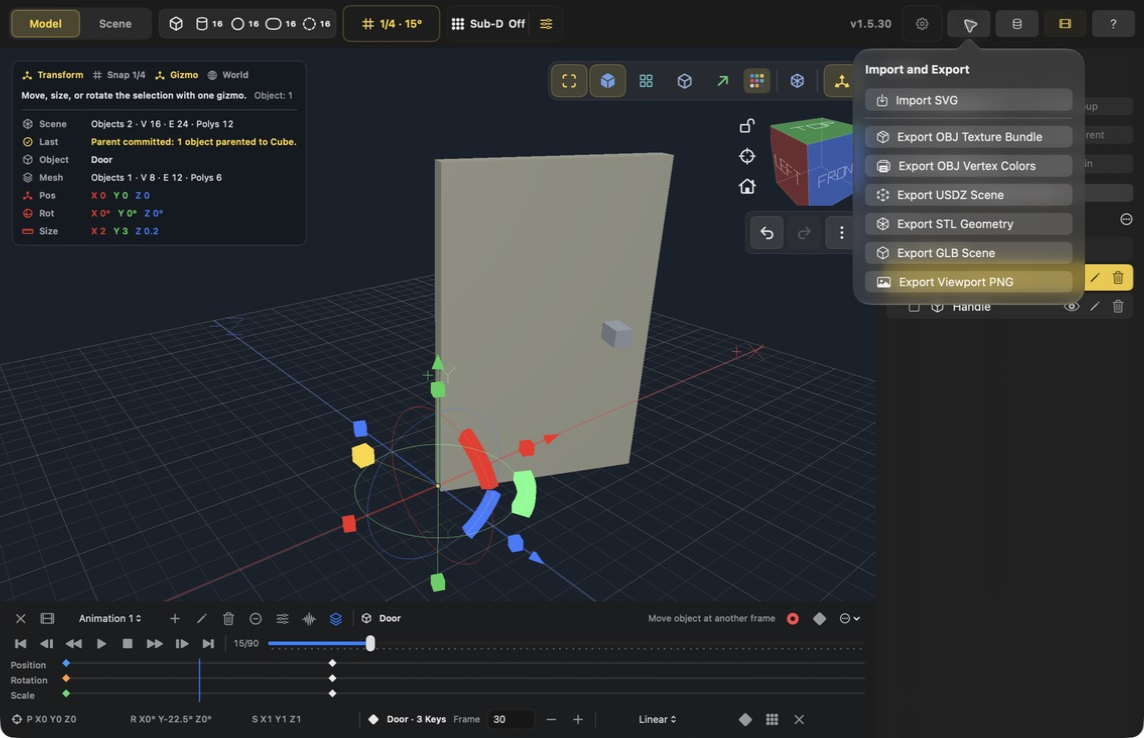
1 — Export GLB Scene. GLB carries the hierarchy and transform animation. STL is geometry-only and cannot preserve this motion. Export uses visible scene objects, so keep both Door and Handle visible. Check document units for the intended physical size; Forge converts GLB positions to meters.
Download the example GLB. This small practice model uses the capture document's centimeter units, so its door is 0.02 m wide. Its exported data contains Door as the parent of Handle and the keyed transform channels. The file was exported from this lesson and its hierarchy and animation samples were checked; playback controls and animation selection vary between external viewers.
Troubleshooting
| Symptom | Likely cause and correction |
|---|---|
| Door spins around its middle | The origin is still centered. Revisit steps 1–2 before keying. |
| Door slides or tilts | A move handle or the wrong rotation arc was dragged. Undo and use the green Y arc. |
| Handle stays behind | Confirm it is indented under Door and Door is the animated object. |
| Door follows the handle instead | The wrong object was active when parenting. Unparent and repeat with Door active last. |
| The second pose disappears when scrubbing | It was not keyed. Check Auto Key or use Add Transform Key before leaving that frame. |
| Closed pose changes unexpectedly | Check the current frame before posing; editing at 0 replaces the initial pose. |
| Motion holds after frame 30 | The clip is longer than the keyed motion; this example deliberately keeps the 90-frame default. |
| Export looks static in another viewer | Select and play Animation 1 in a viewer that supports glTF animation. |
Continue with editing and retiming animation keys, or return to Learn by example.
Continue with Export and check a game asset for unit, material, hierarchy, and animation checks, with a checked painted-door GLB example.