UVs and your first painted face
Create a texture layout for a cube, then color one face. This introduces two separate ideas: UVs place mesh surfaces on a flat texture, while Paint assigns appearance to those surfaces.
Start with: one default cube selected in Object mode in a new document. Screenshots use the Mac SwiftUI app, v1.5.30. The cube's shape should stay unchanged throughout this lesson.
New to the controls? Match the starting state and learn selection/number entry before continuing.
1. Open the UV workspace
Click the UV button in the bottom toolbar, shown as overlapping rectangles beside Paint. The right panel changes from Actions to UV controls.
The top preview shows the flat texture layout. Under UV Maps, the default map is named UVMap. Keep it selected for this exercise.
2. Make an automatic layout
- Scroll down inside the UV panel to Projections.
- Click Smart UV. For this default cube, leave the angle at 66°.
- Under Packing, enable Normalize Islands and Allow Rotation.
- Leave Pack to Others off and Pixel Margin at 4 px.
- Click Pack All.
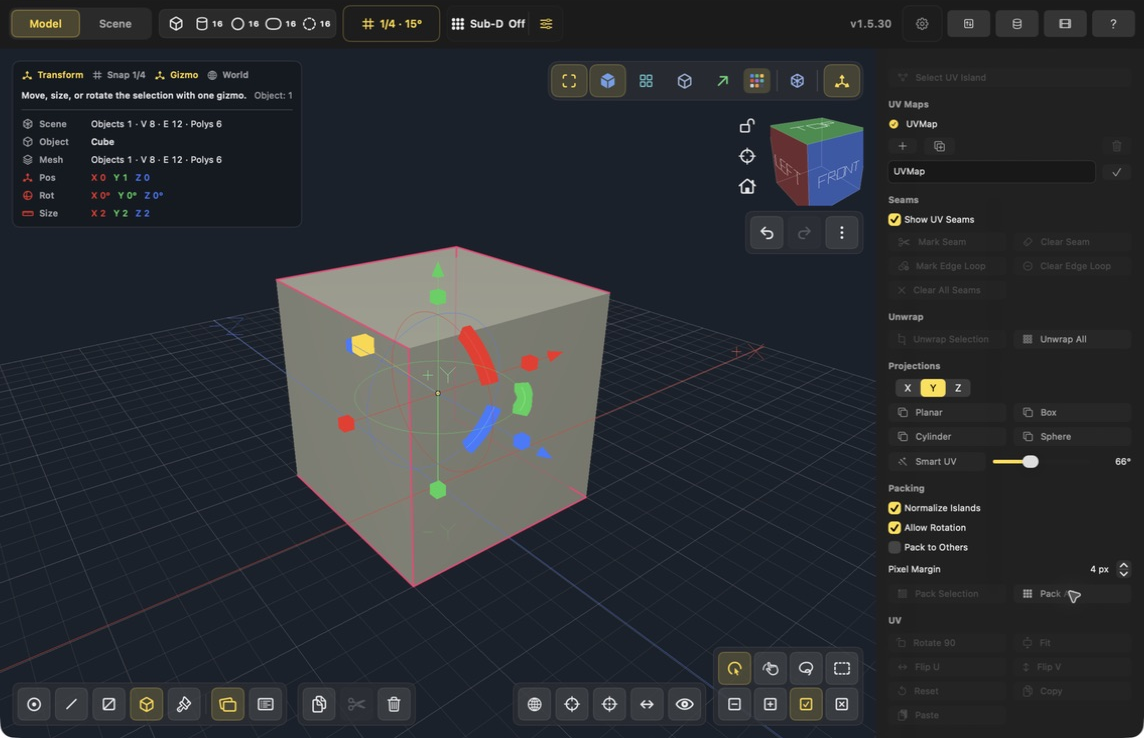
Smart UV creates an automatic starting layout. Packing arranges the islands inside the texture tile. These buttons execute directly; there is no separate Apply/Done step.
Scroll back to the top of the panel to inspect the layout:
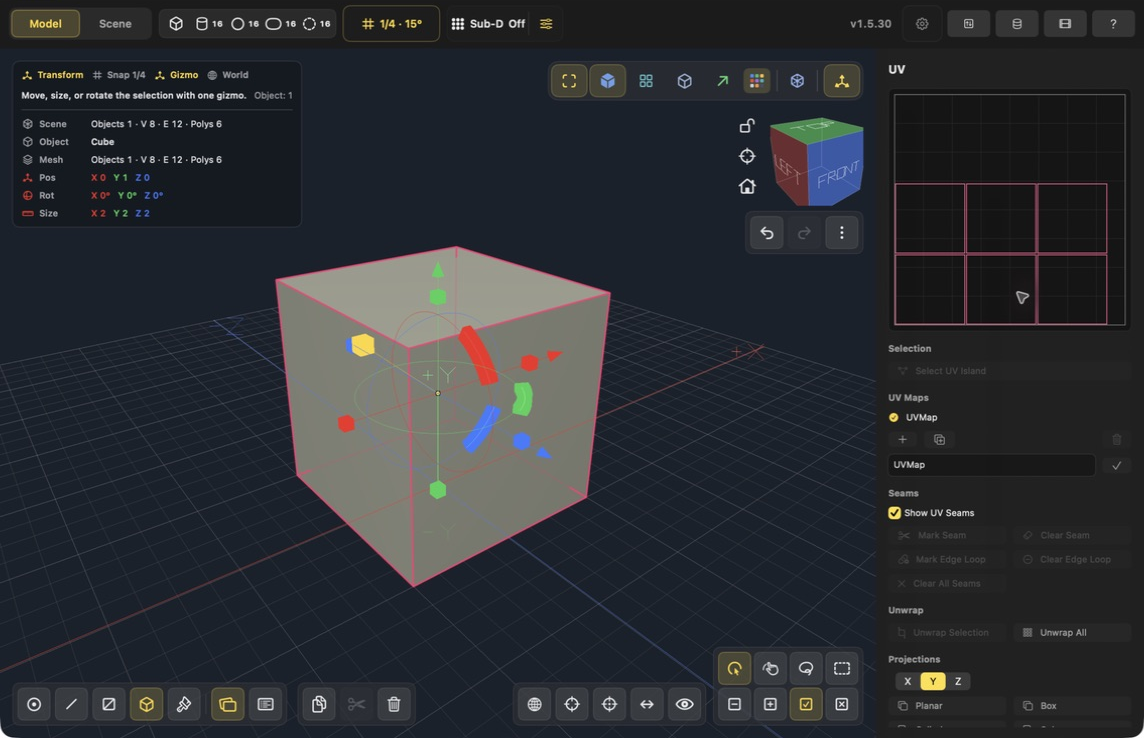
The default cube has six faces. In this example, the UV preview shows six square islands, separated by margins. The pink mesh edges show UV boundaries; they are not cracks in the cube.
What the packing settings mean
| Setting | Purpose |
|---|---|
| Normalize Islands | Makes texture scale more consistent between islands |
| Allow Rotation | Lets the packer turn islands for a better fit |
| Pixel Margin | Leaves space between islands to reduce texture bleeding |
| Pack Selection | Rearranges only selected islands |
| Pack All | Rearranges the complete active layout |
| Pack to Others | Fits the selected islands around existing unselected ones |
An island is a connected patch of faces in UV space. A seam is an edge where the texture layout can split. Smart UV is a quick start; deliberate seam placement gives you more control over where a texture breaks on an important surface.
3. Color one face
- Choose Paint mode using the paintbrush in the bottom toolbar.
- If the UV panel is still open, click the UV button again to return to Paint controls.
- In the small floating paint palette, choose Face scope: the grid icon beside the brush and cube icons.
- Choose Clay in the Material Library. The active material name appears in the right panel.
- Click the cube's top face. It becomes clay-colored while the other faces retain their existing material.
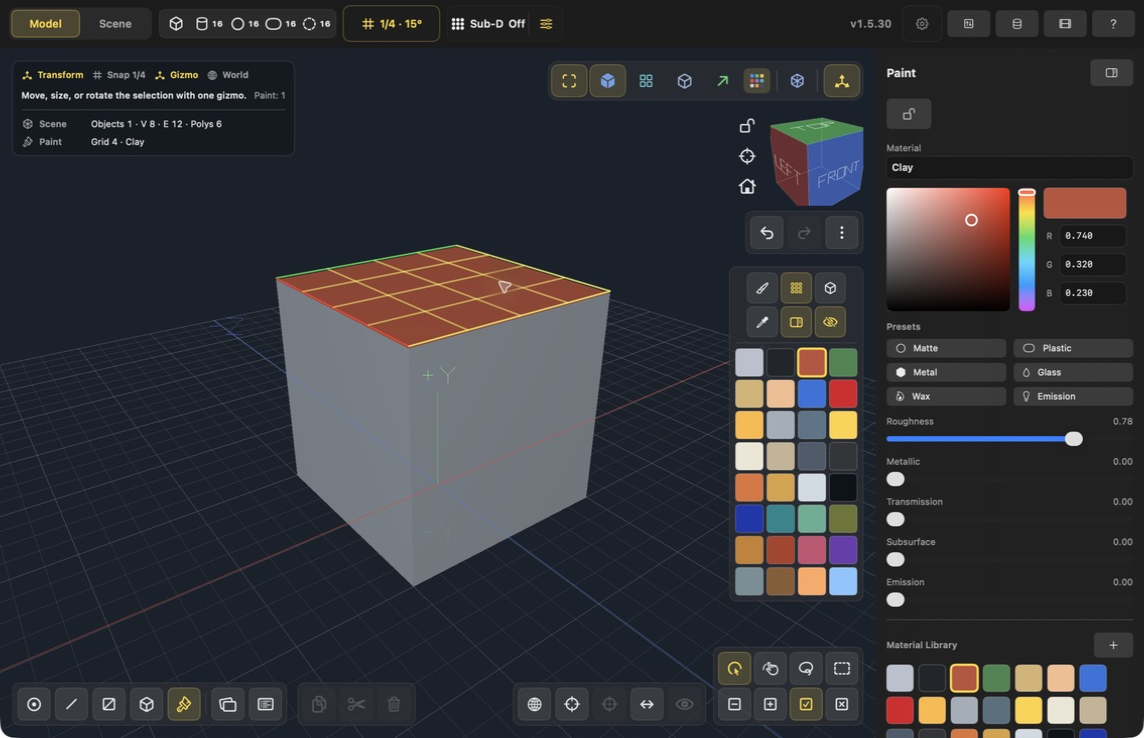
The floating grid icon selects Face painting. The right panel shows Clay and its properties. Painting takes effect on the click; use Undo if you paint the wrong surface.
Face painting is a material assignment. The UV work above prepares the model for texture work; it is not required just to give one face a solid material color.
For continuous freehand strokes, continue with Brush painting, which shows Brush Size and a painted stroke example.
Choose the right paint scope
| Scope | What one gesture affects | Use it for |
|---|---|---|
| Brush — pointed brush | A painted patch along the stroke | Scratches, small markings, highlights |
| Face — grid | The surface you click | A colored panel or alternating face colors |
| Object — cube | The whole object you click | Giving a prop its base material |
Roughness controls how broad or sharp the material's highlights appear; Metallic controls its metallic response. Choose an existing material first, then experiment with its settings. Appearance depends on the viewport's shading mode and lighting.
Troubleshooting
- Mark Seam is disabled: switch to Edge mode and select edges first. It is not needed for this automatic Smart UV exercise.
- Unwrap Selection or Pack Selection is disabled: choose faces or an island, or use the whole-object All command as in this lesson.
- Only the UV controls remain visible in Paint mode: toggle the UV workspace off with its bottom-toolbar button.
- A click colors the entire object: change the paint scope from Object to Face.
- You see only a small painted mark: Brush scope is active; choose Face for a whole surface.
- A texture repeats across unexpected surfaces: inspect the UV layout for overlaps and consider Smart UV or explicit seams, followed by packing.
Continue with seams, projections, and material details, or return to Learn by example.
For a complete seam-to-brush workflow with inspection checkpoints, follow Texture a prop.