Before your first lesson
Use this setup when an example says start with a new document. It gives you the same starting model as the screenshots and shows how to recover when a control is missing.
Start with one cube
On Mac, choose File → New (Command-N). A new document already contains one cube, selected in Object mode. Keep it for the beginner lessons. Clicking the box primitive in the top toolbar creates an additional object.
Stay in Model, the workspace selected at the top left. The default cube is 2 units wide, high, and deep; its Position is 0, 1, 0, Scale 1, 1, 1, and Rotation 0, 0, 0. The units setting determines the physical meaning of those numbers.
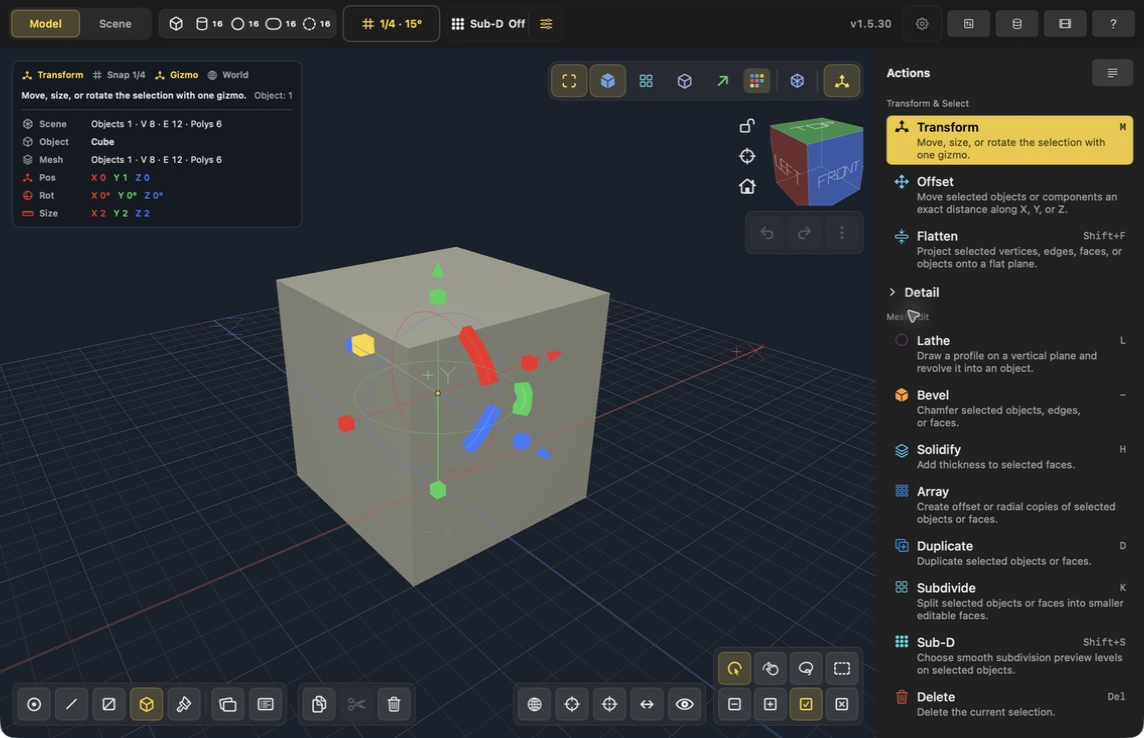
- Model — the workspace used for these lessons.
- Object — the bottom cube button selects whole objects. Face is the diagonally divided square immediately to its left.
- Actions — tools appear here according to what is selected.
- Detail — expand this section for numeric Position, Scale, and Rotation.
- Replace Selection — the checked square lets you select one target without keeping the old selection.
Actual Mac SwiftUI capture, v1.5.30. Click to enlarge. iPad and other desktop layouts can place controls differently; the numbered positions refer to this Mac screenshot.
Select the thing you want to edit
Choose Object for an entire part, Face for a surface, or Edge for a line between faces. Then click that target in the viewport. Changing mode alone does not select a component.
Check the upper-left display: a single selected face must say Face: 1. If it says Face: 0, face tools may be missing.
The colored transform handles can intercept a click. Click clear surface space away from them. If that is difficult, toggle the three-direction arrows at the right end of the viewport display strip to disable the gizmo, select the face, then toggle it on again when you need transform handles. Disabling the gizmo does not remove geometry.
Enter exact numbers
Click the numeric field, select its existing value (Command-A on Mac), type the new number, then press Return. Check the displayed value before continuing. This replaces the old number instead of appending digits to it.
For preview tools such as Inset, Extrude, and Bevel, Return accepts the amount; Apply commits the preview and Done leaves the tool. For Transform Position, Return commits the edit directly. See Apply, Done, and Undo for the differences.
Recover your controls or view
| What you see | How to continue |
|---|---|
| A timeline instead of the bottom modeling buttons | Close Animation with the highlighted film button in the top toolbar. |
| UV or Scene instead of Actions on the right | Toggle the matching bottom-toolbar UV or Scene Outliner button off, then choose the required selection mode. The top Scene workspace switch is a different control. |
| Only tool icons | Cycle the small layout button in the Actions header until names and descriptions appear. |
| A tool or Apply is farther down the list | Scroll with the pointer inside the right panel. Scrolling over the viewport changes the view instead. |
| Other tools are dimmed | Finish the current tool. Apply first if you want to commit its preview, then Done. Knife uses Apply Cut or Cancel Cut. |
| One object fills the view and another seems lost | Click the house / Look At Center button below the View Cube. It restored both boxes in the alignment exercise. |
| You need a straight-on view | Click Front on the View Cube. This can reframe the selected object; use Look At Center afterward if you need the other objects visible too. |
Start with Make a raised panel. When that lesson is finished, choose File → New for Round and repeat a part; do not apply its cube-specific values to the raised-panel result.