Compose and animate a scene
Build a small composition with a model, a camera, and an animated point light. Then animate the camera's position and lens. Screenshots are direct Mac v1.6.39 captures. Use the same named controls on other platforms; dock placement can differ with the layout.
1. Start in Scene
Choose File → New, keep the default cube, and switch the top Model / Scene control to Scene. A new project includes a Cube asset and a placement in Scene 1, together with a camera. Select items under the scene's heading in the browser to edit their properties and transforms.
Model edits change the source geometry. Scene transforms change a placement: moving an instance does not reshape its source. Use Edit Model to return to that shared source. The Assets browser lets you add further model instances; use Create Scene for a separate composition in the same project. Save the Forge project to retain its models, scenes, and animation.
The top Scene workspace is separate from Model's bottom-toolbar Outliner. Camera and light creation lives in Scene → Add.
2. Choose a camera
Select Camera beneath Scene 1. To add another, choose Add → Camera.
| Control | What it changes |
|---|---|
| Projection | Perspective or Orthographic |
| Vertical FOV (°) | Perspective lens angle; a smaller angle narrows the view |
| Size | Orthographic viewing span |
| Near Clip / Far Clip | The depth interval visible to the camera |
| Position / Rotation | The camera's placement and direction |
| Parent | An item whose transform the camera follows |
| Target | An aim constraint; Free Rotation leaves direction under manual control |
Use the top Camera View button to look through a scene camera. With multiple cameras, use its arrow to choose one. The button changes to Editor Camera, which returns to the preserved editor view. Navigation while looking through a scene camera edits that camera, so return to Editor Camera when you only want to inspect the composition.
For this exercise keep the default perspective camera at Position 0, 2, 6 and Rotation 0, 0, 0. Later, try Target on a distinctively named scene item to keep the camera aimed at it as it moves. Remove the constraint with Free Rotation before experimenting with manual rotation.
3. Add a light
Choose Add → Point Light, then select its row in the scene browser. Enable Use Scene Lights, the lightbulb button in the top Scene toolbar. This enables Studio/PBR lighting. Keep Light Enabled on.
For the default cube, start with the point light at Position 0, 3, 3, white color, Intensity 1, Range 10, and Falloff Exponent 2. Return to the editor camera for a clear view of the cube. You can move the light with the transform controls or gizmo.
| Light type | Useful controls and behavior |
|---|---|
| Directional | Direction, color, intensity; useful for broad illumination |
| Point | Position, range, falloff; emits around its position |
| Spot | Position and direction, range, inner and outer cone angles |
| Area | Position and direction, width and height |
Cast Shadows controls each light's shadows. Authored scene lights can be combined with environment illumination; a bright environment may make a subtle intensity change harder to see. Check both the toolbar's Use Scene Lights state and the individual Light Enabled switch if a light appears to have no effect.
4. Animate the light's intensity
- Select Point Light, open Animation with the film button, and choose Create Clip. A new clip records the starting transform at frame 0 and advances to frame 30.
- Return the timeline to frame 0. Set Intensity = 1, then click Key Properties in the light inspector. Confirm Keyframes: 0 appears.
- Move to frame 30, set Intensity = 8, and click Key Properties again. Confirm Keyframes: 0, 30.
- Scrub to frame 15. With linear interpolation, Intensity reads 4.50. Scrub between the endpoints to inspect the changing illumination, then use Play.
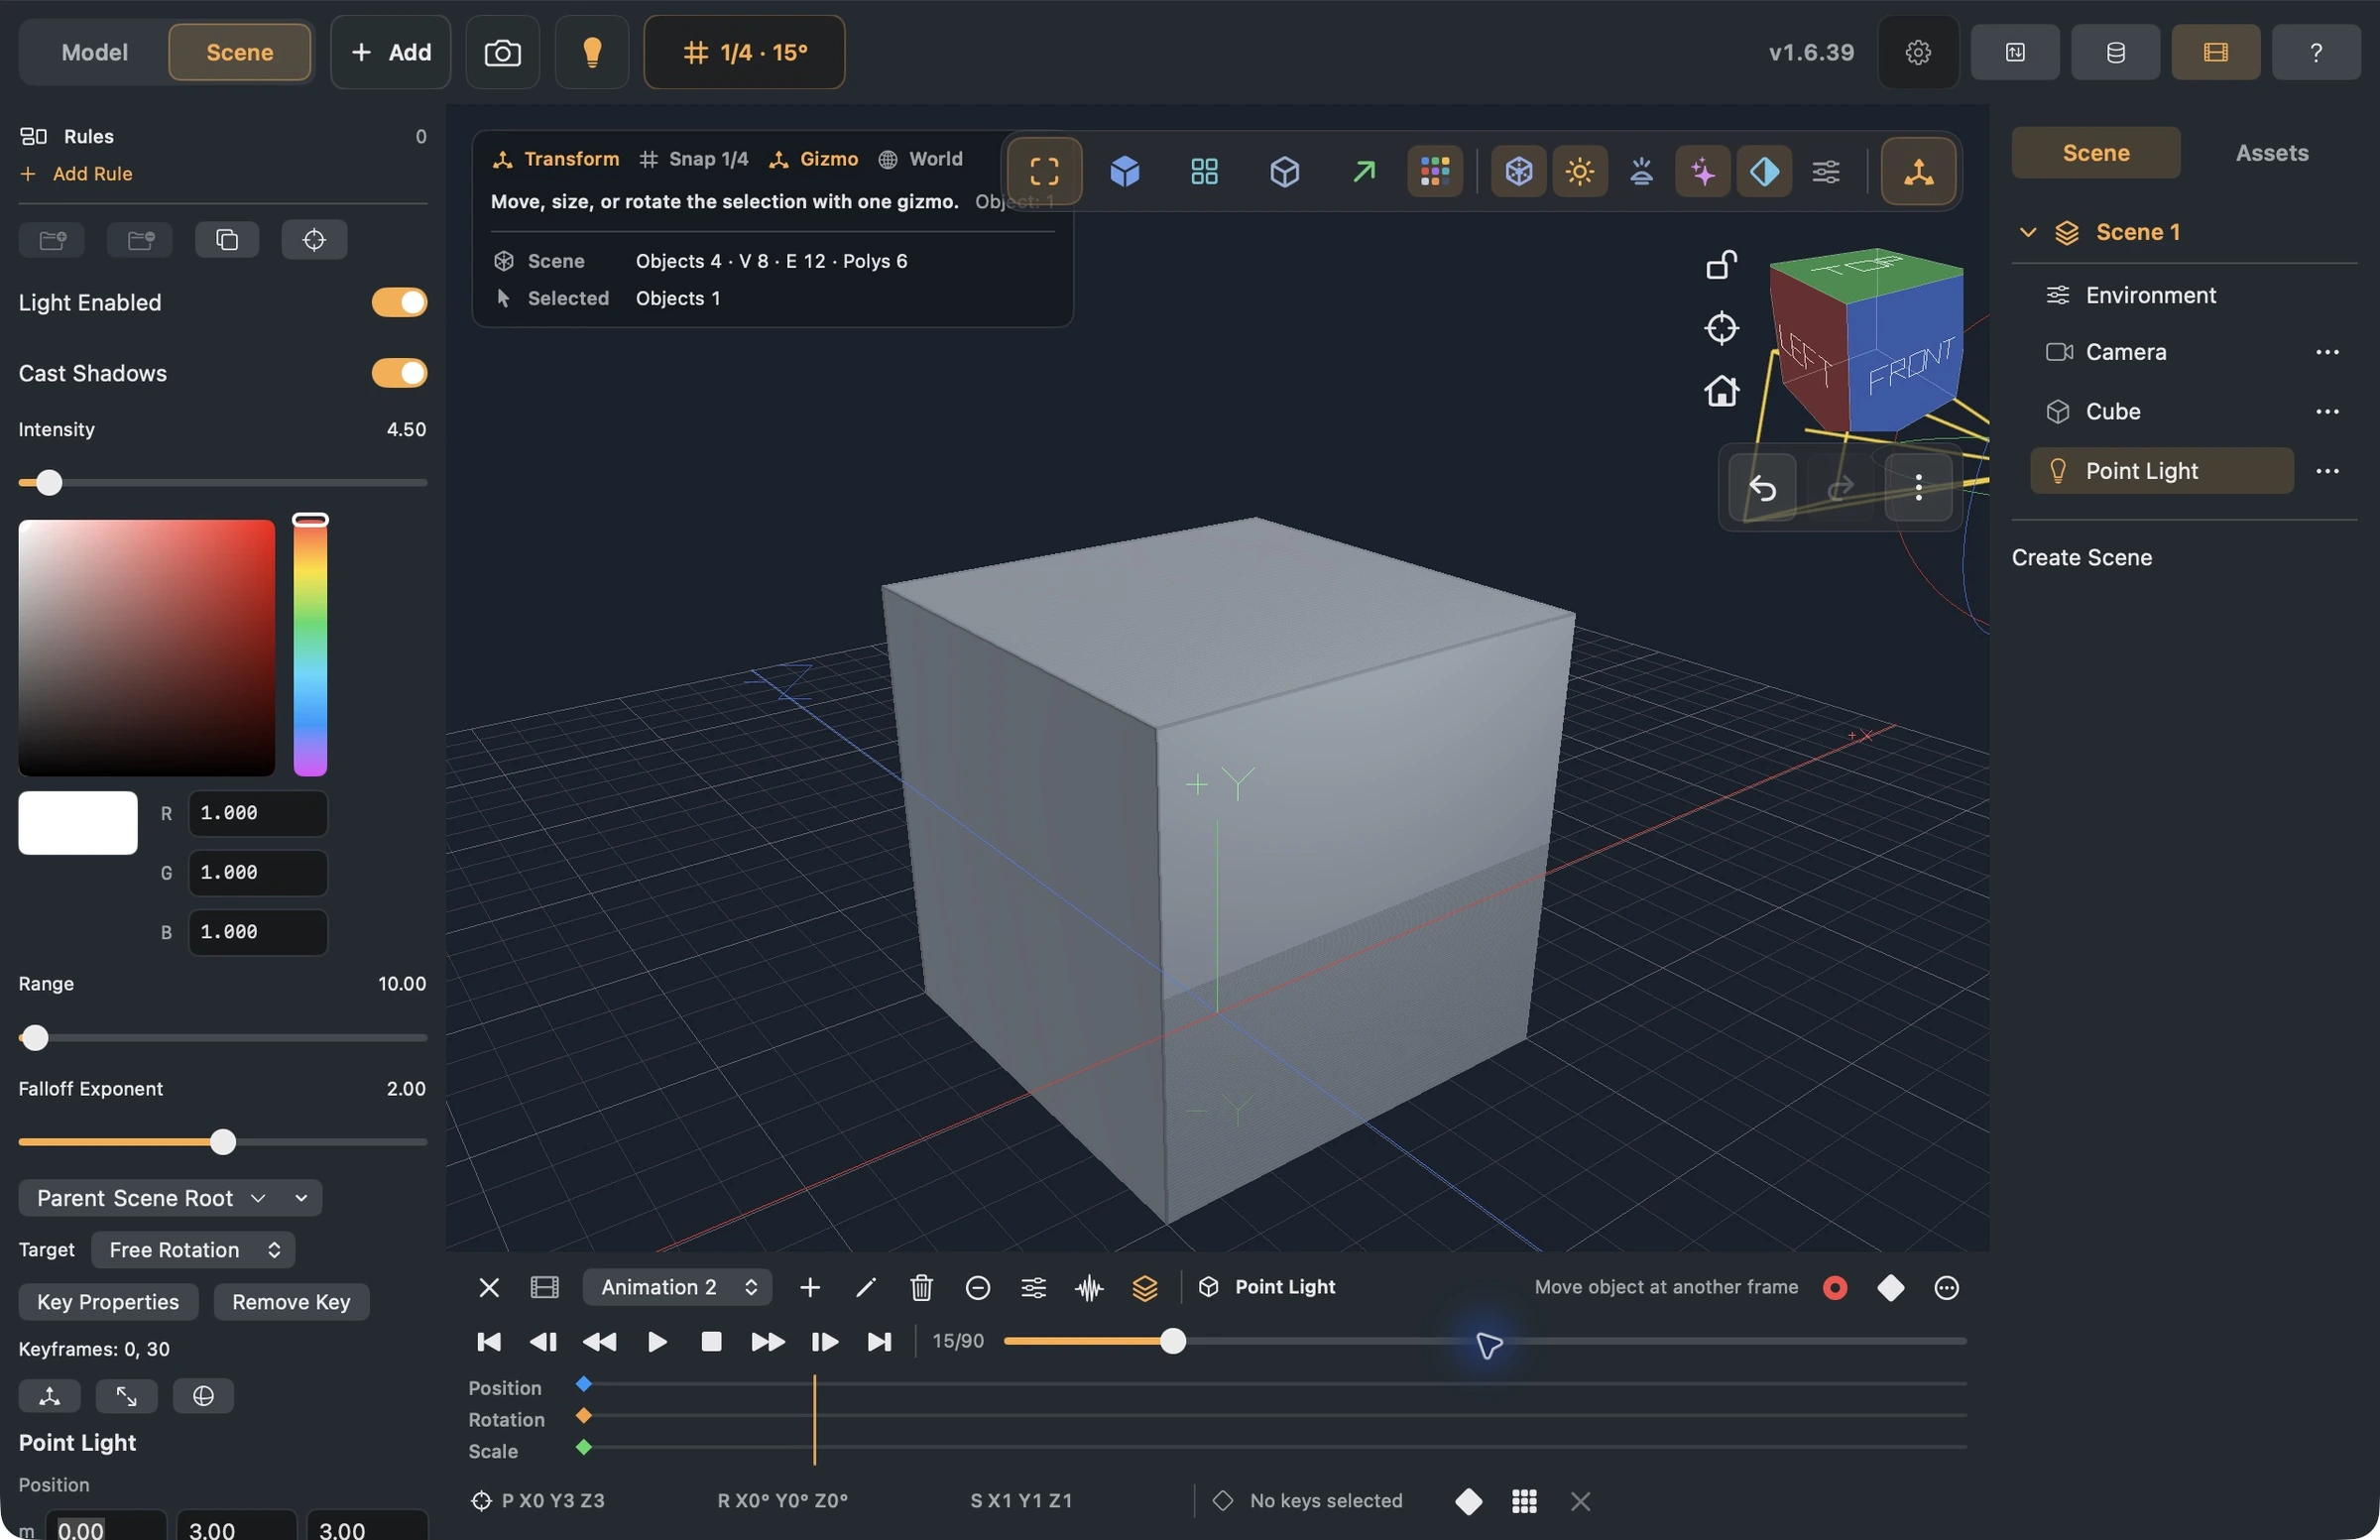
Key Properties records the selected node's camera or light settings at the current frame. It is separate from Add Transform Key, which records position, rotation, and scale. Once property keys exist in the selected clip, inspector edits update properties at the current frame; watch the playhead before changing a value. Use Key Properties explicitly at each intended pose to make the workflow clear.
Color, range, falloff, spot angles, and area dimensions can also be keyed. Enabled, Cast Shadows, and camera projection are discrete changes rather than gradual blends. Remove Key removes the selected node's property key at the current frame; it does not remove its transform keys. These buttons are disabled until a clip is selected.
5. Animate a camera move and lens change
Select Camera and choose Create Clip if it has no clip yet. Each item remembers its chosen clip; selecting the camera does not keep the light's clip active. Use the camera's own clip for this exercise.
- At frame 0, set Position 0, 2, 6 and Rotation 0, 0, 0. Click Add Transform Key. Set Vertical FOV = 55° and click Key Properties.
- At frame 30, change Position X to 2, keeping Y = 2 and Z = 6. Click Add Transform Key. Set Vertical FOV = 40° and click Key Properties.
- At frame 15, the current pose reads X = 1, Y = 2, Z = 6 and the FOV reads 47.50° with linear interpolation.
- Switch to Camera View to watch the framing change during playback. This simple sideways move lets the subject drift in the frame; use a Target constraint when you want it to remain aimed at the subject.
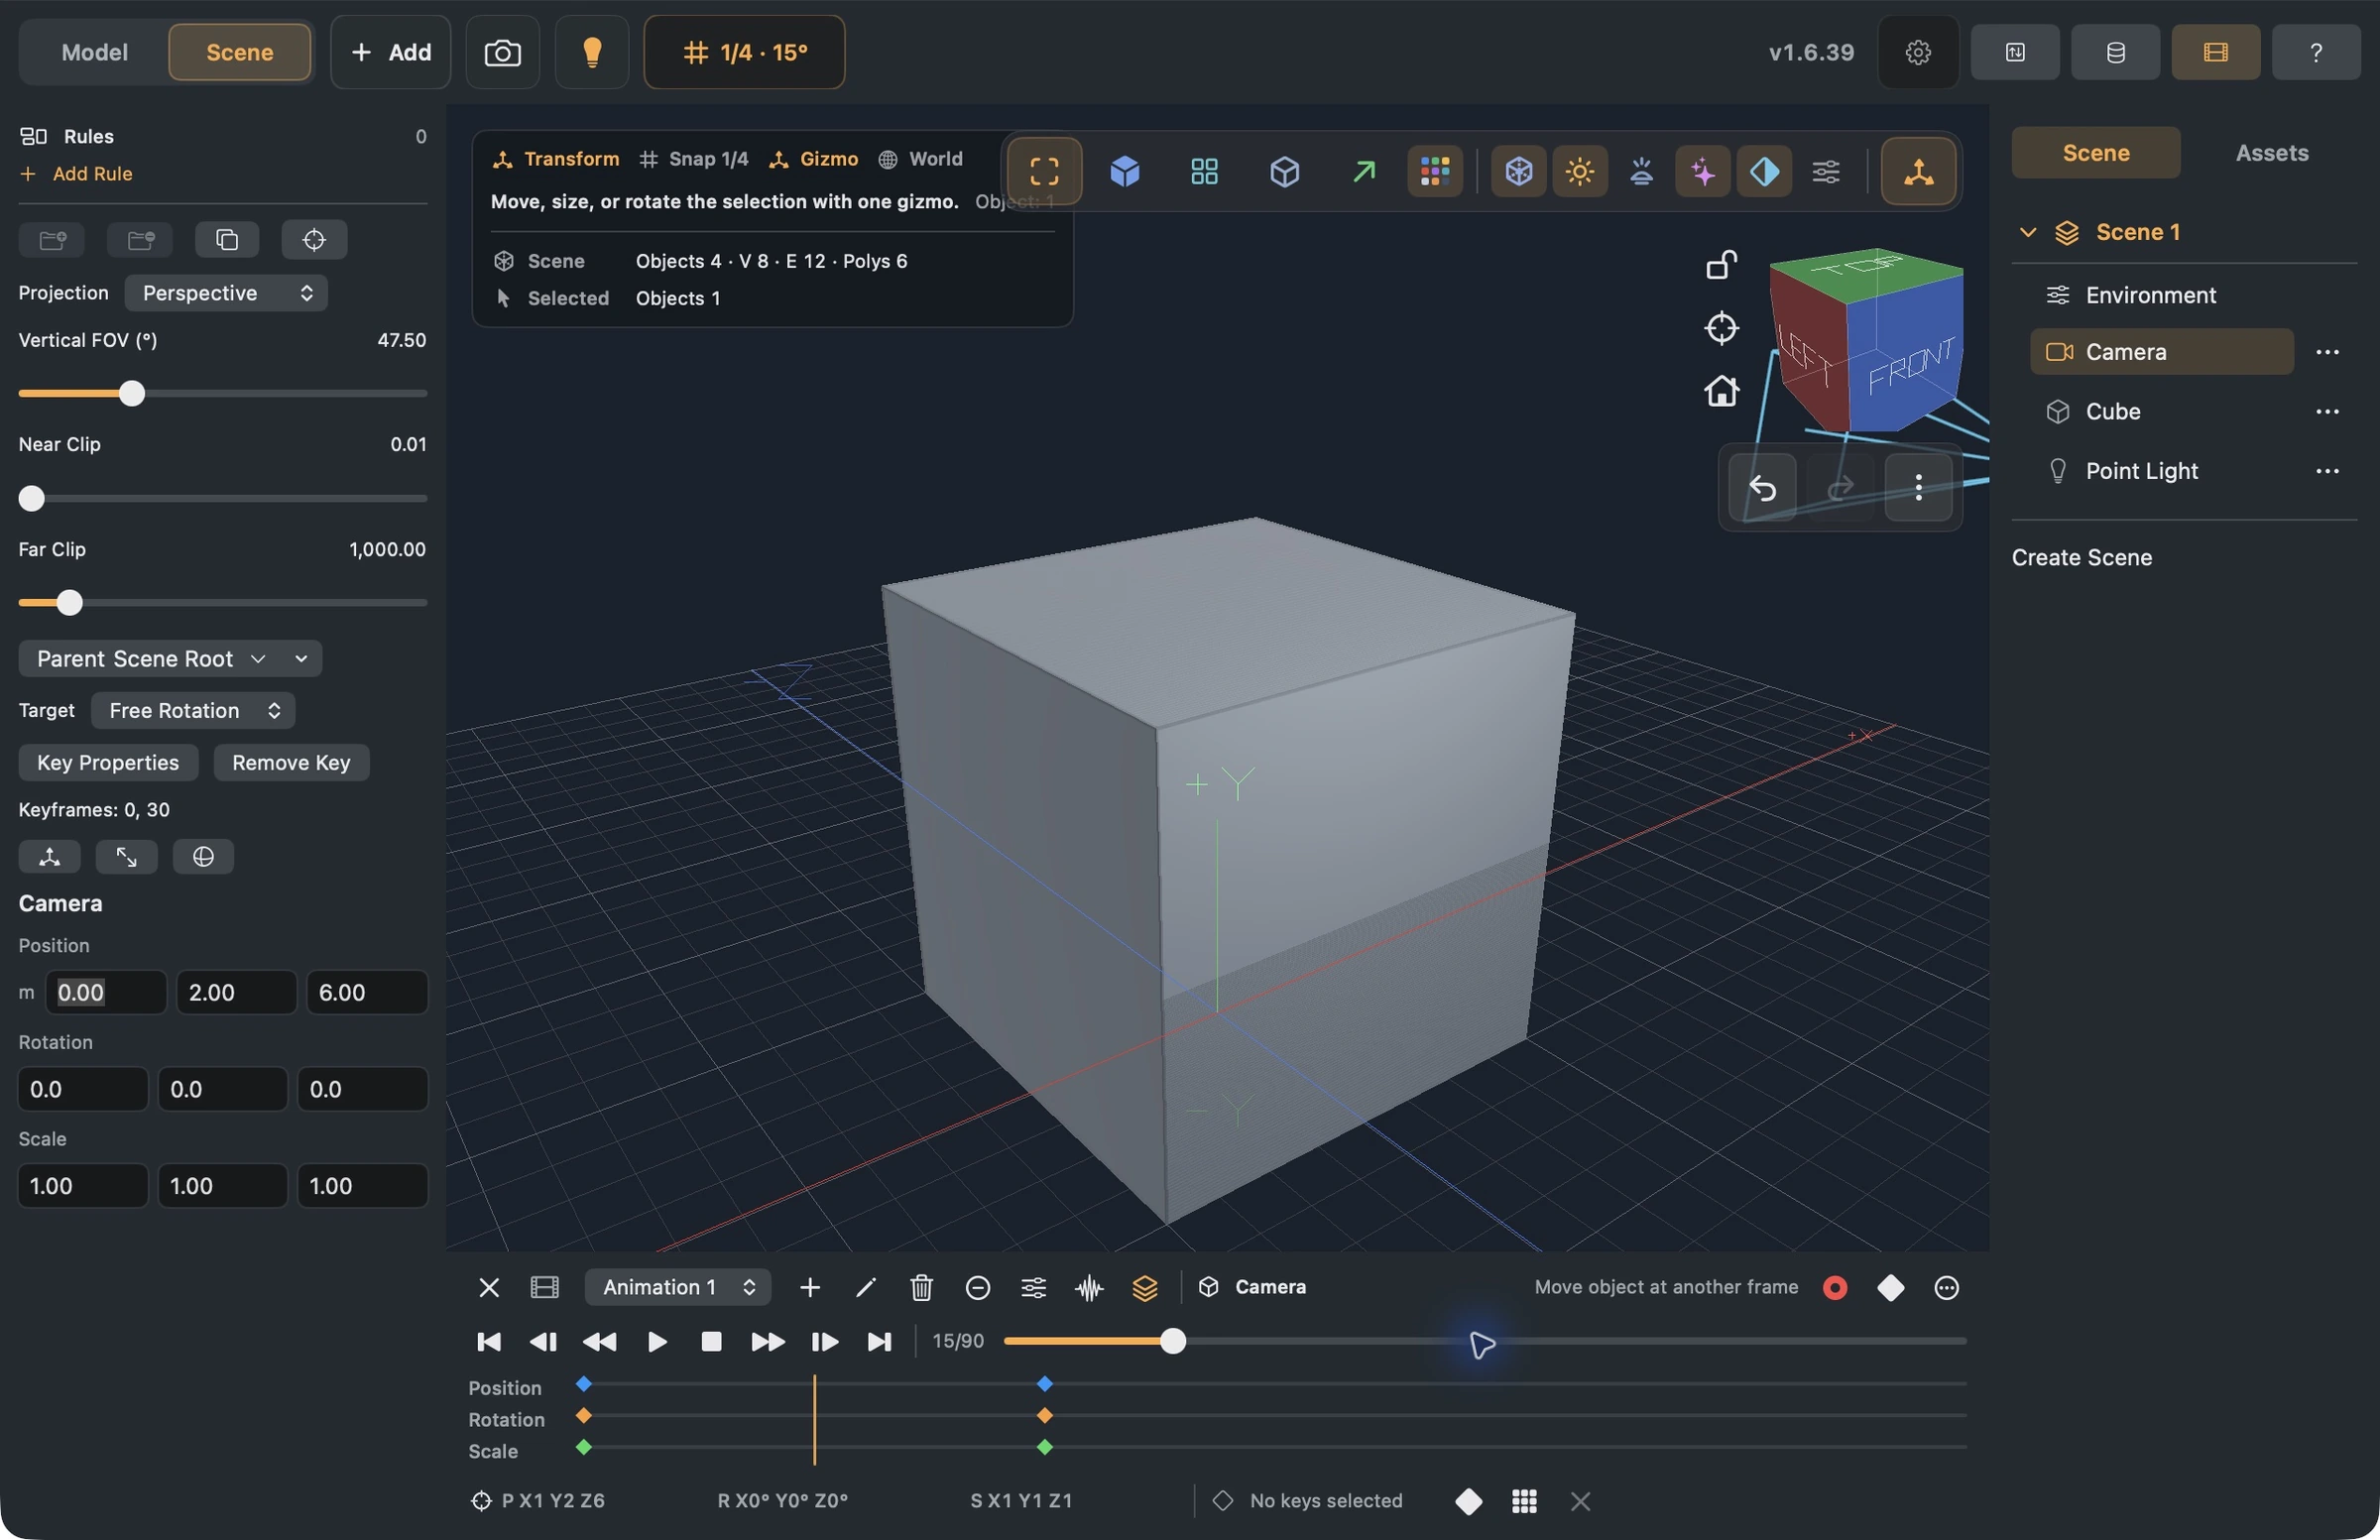
Auto Key can record changed transforms when enabled. Explicit Add Transform Key makes both poses clear regardless of its state. The timeline's current-pose readout shows evaluated movement; inspect it when checking an in-between frame.
6. Preview the composition together
Enable Preview All Items to play the camera and light together. Each item retains its selected clip and timing on the shared playback clock. Match their frame rates and durations in Clip Settings when you want their changes synchronized. Turn Preview All Items off to isolate one item's clip while adjusting it.
Keep Camera View active to judge the shot, or return to Editor Camera to inspect the moving items. Close Animation with the film button when finished; this keeps the clips and keys. Save your Forge project to preserve the editable composition. The GLB asset lesson covers model transform-animation export; it does not establish camera, authored-light, aim-constraint, or property-key export support.
If the result is unexpected
| Symptom | Check |
|---|---|
| Camera or light tools are missing | Switch the top workspace to Scene and open Add |
| Key Properties is disabled | Select the camera/light and select or create its animation clip |
| The light does not brighten the model | Use Scene Lights, Light Enabled, range, position, and environment brightness |
| The camera points away from the subject | Check Rotation and Target; return to Editor Camera to inspect its placement |
| The light animates but the camera stays still | Enable Preview All Items and check the camera's selected clip |
| Keys appear only on Position/Rotation/Scale | Those are transform tracks; check the inspector's Keyframes list for property keys |
Continue with Animation for clip management, interpolation, and parented assemblies, or Rendering and export for Studio and output settings.