Texture a prop from seams to brush strokes
Give a simple box prop a charcoal base and a gold identification mark. You will mark a seam, unwrap and inspect the UVs, pack the layout, and paint directly on the surface.
Start with: a new document containing the default cube, in the Model workspace. Keep its default shape for this first pass. This lesson was performed in the Mac SwiftUI app, v1.5.30. Screenshots are real captures with the title bar cropped; click them to enlarge.
New to the controls? Match the starting state and learn selection/number entry before continuing.
1. Choose where the texture can split
A UV map lays the model's surfaces flat on a texture. A seam allows that layout to split along a mesh edge. It does not cut the geometry or make a visible hole.
- Choose Edge mode: the diagonal-line button in the bottom toolbar.
- Click one of the cube's upper edges. The example selects the upper edge on the left side of the view. Check that the upper-left status says Edge: 1.
- Open UV using the overlapping-rectangles button beside Paint in the bottom toolbar.
- Under Seams, click Mark Seam. Leave Show UV Seams enabled.
- Under Unwrap, click Unwrap All.
These commands take effect directly. There is no separate Apply or Done button.
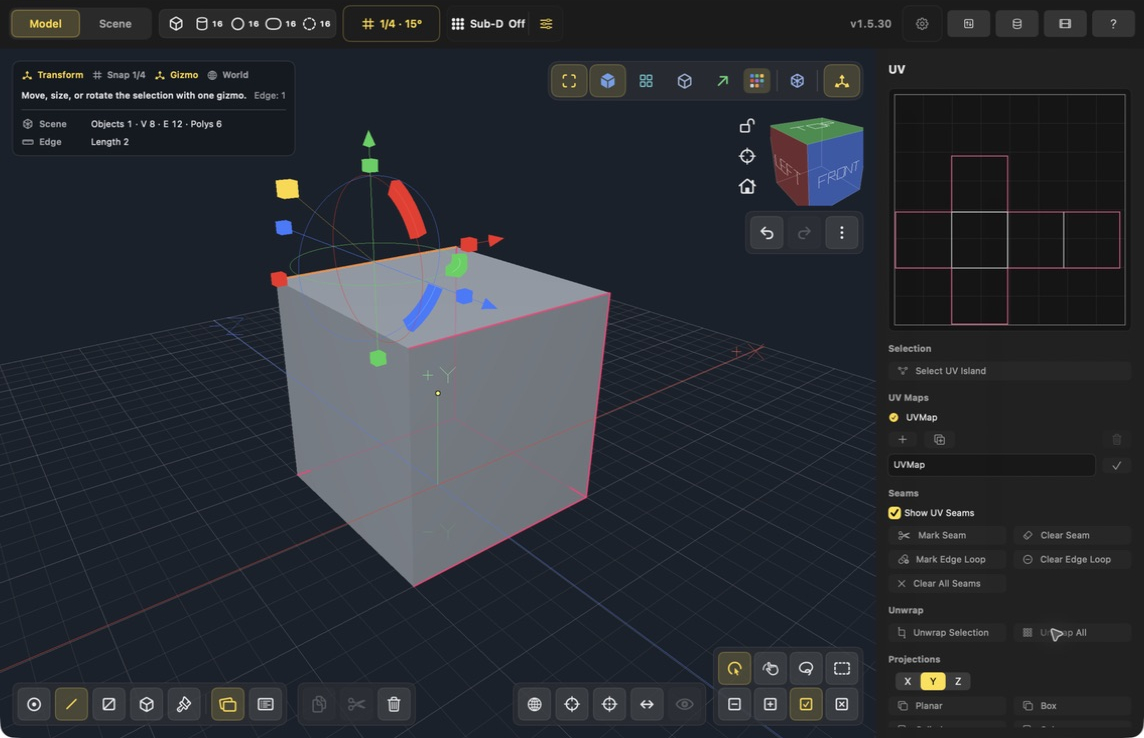
1 — Mark Seam. 2 — Unwrap All. 3 — Resulting UV layout. In this example the six faces unfold into a cross of squares. The unwrap operation can introduce additional chart cuts; one authored seam is not a promise that every other edge stays connected.
For a finished prop, place seams along less conspicuous edges, such as the underside or back, and try to keep a logo area within one island. Avoid putting a seam through the middle of a surface that needs an uninterrupted marking. Different geometry and existing UV splits can produce a different layout.
2. Pack the layout
Scroll down inside the UV panel to Packing:
- Enable Normalize Islands to make texture scale more consistent.
- Enable Allow Rotation so islands may turn to fit.
- Leave Pack to Others off; you are arranging the whole layout.
- Set Pixel Margin to 4 px for this exercise.
- Click Pack All, then scroll back to the UV preview.
Packing arranges the existing islands; it does not choose better seams or repair a distorted unwrap. A layout that already fits may change very little. The margin here is a starting point for practice, not a universal export setting: small textures and distant views can need more separation to avoid color bleeding.
For a close view of these controls, see the packing screenshot.
3. Check the mapping before painting
Switch to Face mode, click Deselect All (X square at the bottom right), then click one face away from the transform handles. Check Face: 1 in the upper-left status display.
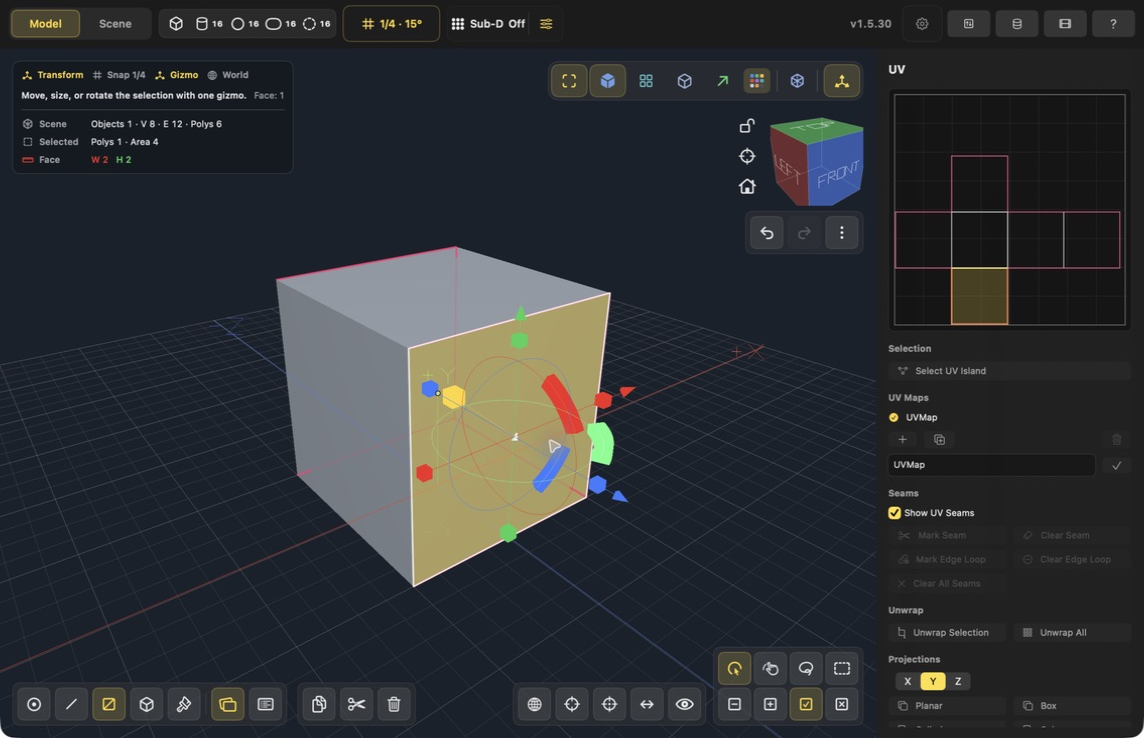
1 — Selected surface. 2 — Its UV square. Selecting another surface lets you match it to the layout. On this unscaled cube, each square face should occupy a similarly sized square in UV space.
| Check | What to look for | What to do if it looks wrong |
|---|---|---|
| Shape | Square cube faces remain square in the UV preview | Revisit seams and unwrap. Packing alone cannot remove stretching. |
| Relative size | Equal-size faces receive similar texture space | Try Normalize Islands before Pack All. |
| Overlap | Unrelated faces do not occupy the same texture area | Re-unwrap or use Smart UV, then pack. Shared UV space shares paint. |
| Boundaries | The layout stays inside the texture tile | Use Pack All and inspect again. |
| Placement | An important marking fits on a continuous surface | Move the seam away from that area and unwrap before detailed painting. |
For an easier alternative on a box, Smart UV can create separate face islands automatically. Follow UVs and your first painted face for that route. It is an alternative layout, so do not expect its six separate squares to match this cross.
4. Apply the base material
- Choose Paint using the bottom-toolbar paintbrush.
- If UV controls remain visible, click the UV button again to reveal the Paint panel.
- In the floating paint palette, choose Object scope: the cube icon beside Brush and Face.
- Choose Charcoal in the Material Library. Confirm the active material name in the right panel.
- Click the cube to give the whole prop a dark base.
The base material is applied immediately. If you color only a face or leave a small mark, check the separate paint-scope buttons. Object selection mode and Object paint scope are different controls.
5. Paint the identification mark
- Choose Brush scope: the pointed paintbrush in the floating palette.
- Choose Gold in the Material Library.
- Set Brush Size to 40 px.
- Drag a vertical stroke down the front-facing surface, then add two shorter strokes across it to form an F. Keep the strokes inside the face on this first attempt.
- Use Undo to remove a mistaken stroke, then try it again with a smaller brush if needed.
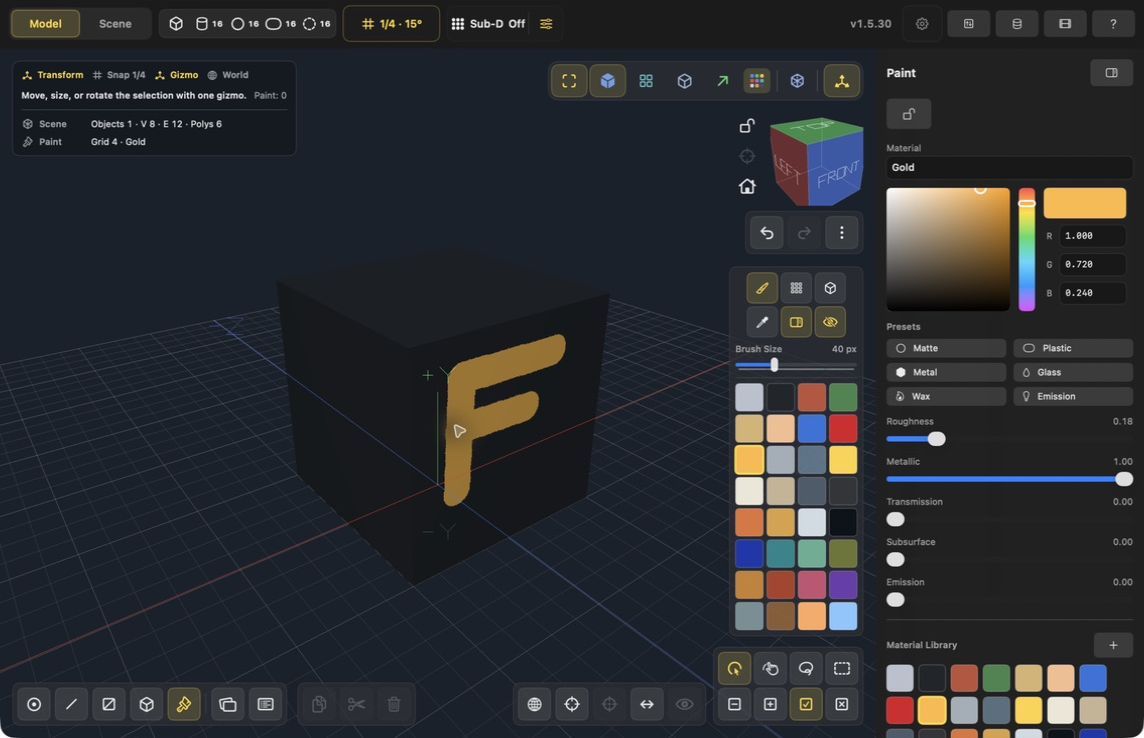
1 — Brush scope. 2 — Brush Size. 3 — Active material. Each drag paints continuously. Modeling grid spacing does not divide the stroke into blocks. A 40 px brush describes its texture footprint; zoom level and UV scale affect how large it looks on the model.
Orbit the cube to check that the mark stays on the intended surface. For a useful test of your own UV layout, paint a short temporary stroke near an edge, inspect the neighboring surface, then Undo it. Unexpected repeated marks can reveal overlapping UVs.
6. Save and inspect the finish
Save the editable Forge document with File → Save. Keep that source document so you can return to the geometry, UVs, and materials.
For a lighting check, enable Studio/PBR with the transparent-cube button near the top of the viewport, then enable Environment. Gold's metallic response depends on lighting; a dark or flat appearance alone does not mean the paint failed. See rendering and export for the preview controls and supported output formats.
Troubleshooting
| Symptom | Check |
|---|---|
| Mark Seam is disabled | Use Edge mode and select an edge. |
| The UV preview has no highlighted face | Use Face mode, clear the old selection, and click a surface. |
| The whole cube becomes gold | Switch from Object paint scope to Brush before dragging. Undo the unwanted assignment. |
| A click fills a whole face | Face paint scope is active. Choose the pointed brush. |
| Marks repeat on another face | Inspect UV overlaps before adding more detail. |
| Strokes look stretched or uneven | Inspect UV shape and relative face sizes; try a smaller brush after correcting the mapping. |
| Material colors are not visible | Enable Textures in the viewport toolbar. |
| Only UV controls are shown | Toggle the bottom-toolbar UV button off to return to Paint controls. |
Continue with material properties and UV adjustments, or choose another task in Learn by example.
Continue with Export and check a game asset for unit, material, hierarchy, and animation checks, with a checked painted-door GLB example.